In this article, we cover how to use XPath in Selenium, including XPath in Selenium basics and more advanced techniques like axes methods.
Depending on your use case, you may encounter situations where it’s challenging to locate dynamic web elements with the usual DOM attributes. This is where XPath in Selenium shines!
If you’re familiar with Selenium, you’ll know it’s a powerful open-source automation and software testing tool popular for web application testing, cross-browser testing, and web scraping.
So whether you’re a test automation engineer, QA engineer, or web developer, learning how to use XPath in Selenium can be incredibly useful, not to mention lucrative, with the Bureau of Labor and Statistics reporting median salaries in excess of $100,000 for Software Testers.
In this article, we’ll provide background on XPath, cover the general syntax, and then dive into detailed step-by-step examples for XPath in Selenium.
So let’s dive in to learn how to use XPath in Selenium!
What Is XPath In Selenium?
If you’re new to XPath and you’re looking for an XPath cheat sheet, start here!
XPath is a query language that you can use to navigate and select elements in an XML or HTML document.
This allows you to locate elements within the DOM structure of a webpage with an expression focused on the element name, attributes, relationship with other elements, or position in the document hierarchy.
In the context of Selenium, XPath is a powerful tool that you can use to locate and interact with web elements. If you’re familiar with Selenium, you can use XPath with the WebDriver API’s findElement() or findElements() methods.
This makes Selenium XPath ideal for testers and developers, as it allows them to automate interactions with specific elements, such as clicking buttons, entering text into fields, or extracting web page data.
Put simply, XPath can be massively helpful for web testing, scraping, or data extraction tasks, meaning it’s an excellent skill to add to your repertoire when actively exploring the software tester job market.
We should point out that you can also use XPath expressions directly within your browser’s Developer’s Tools. You can then interact with the DOM for a particular web page.
What Is The DOM?
Just in case we’re throwing around terms that seem a little alien, let’s take a minute to touch on the DOM, or Document Object Model.
In a nutshell, this is a programming interface for web documents (HTML or XML) and uses a tree-like structure composed of nodes, with each representing an element or attribute in the document.
One of the major use cases of the DOM is to allow developers and programs to dynamically access or update a web page’s content or style. Developers can also use the DOM to create interactive and dynamic web pages that respond to user input or update in real-time.
Important note, the DOM is not part of a specific programming language but is in fact a standard that’s been implemented by most major web browsers.
Well, that’s enough of that, let’s get back to XPath!
The Different Types Of XPath Expression
Generally speaking, you can construct two types of XPath expression by using either an absolute or relative XPath.
Absolute XPath
An absolute XPath is a complete expression that begins with a single forward slash (/) to indicate the document’s root, and it then specifies the complete path to an element.
This means that an absolute XPath specifies the absolute position of an element in the document hierarchy. Let’s use an example to visualize this.
Consider the following XML document of a bookstore, as shown below.
<bookstore>
  <book category="Sci-Fi">
    <title>Dune</title>
    <author>Frank Herbert</author>
  </book>
  <book category="Mystery">
    <title>The Da Vinci Code</title>
    <author>Dan Brown</author>
  </book>
</bookstore>
If we wanted to use an absolute XPath expression to select the title element for the first book, we’d use the Selenium XPath syntax shown below.
Absolute XPath
------------------------

/bookstore/book[1]/title
Notice that this starts with a forward slash to specify the document’s root, followed by the complete path to the title element, including the bookstore element and an index for the book.
Important: Absolute XPaths are useful when the document structure is static or unlikely to change, but they can become long or even invalid if the document structure changes.
Relative XPath
A relative XPath does not begin with a forward slash (//), meaning it does not start at the root. Instead, it provides a path that’s relative to the current context or element by starting with a double forward slash.
Let’s continue with the bookstore example, but use a relative XPath to find the element with the title shown below.
Relative XPath
------------------------

//book[@title='Dune]
In this case, the expression selects all book elements that have a title attribute with a value of Dune. This is a classic example of how XPath expressions are typically used, as you can use this relative XPath to filter elements regardless of any changes within the document structure.
Overall, a relative XPath can locate elements based on their relationship to other elements or attributes in the document, making them more flexible and adaptable to document changes.
How To Write XPath In Selenium
Now that we’ve covered the different types of XPath, let’s take a moment to cover the general XPath syntax in Selenium, as shown below.
General XPath Syntax
--------------------------------

<axis><nodetest>[<predicate>]
There are three different components at play here, so let’s go through them one-by-one, starting with the axis.
In the simplest possible terms, this is used to specify the direction of navigation from the current node. If we wanted an absolute XPath expression, this would be a single forward slash, while a relative XPath would use a double forward slash.
Great, let’s take a look at that nodetest component. This is used to represent the element or node that you want to target, and we have various methods available to do this.
For example, we could use the element’s name to find the element with the given name, we could use the asterisk (*) wildcard to select any element, or we could use @attribute to select attributes.
Finally, we have the predicate, which is an optional parameter, as indicated by the square brackets. That said, this is really useful for filtering based on a condition, like an attribute value or an element’s position in a sequence.
Let’s put this all together and look at an example XPath expression that combines each of these general syntax components with our bookstore example.
XPath General Syntax Example
-----------------------------------

//book[@author='hackr.io']
In this case, we’ve used a relative XPath expression to return a specific book element with a certain author name. We do this by using the following components from the general syntax:
- axis = //: This selects nodes anywhere in the document
- nodetest = book: This specifies that we’re targeting book elements
- predicate = [@attribute='value']: This filters elements for an author attribute with a value equal to hackr.io
Typical Locators for XPath Expressions
When the time comes to find an element with XPath, you’ll need to design a query that uses one of several options for element location
Let’s take a look at some common locator examples that you can use to find an element in an XML or HTML document. These can also be combined to navigate and select elements.
|
Locators for XPath Expressions |
||
|
Locator |
Description |
Example |
|
Tag Name |
Locate elements based on their tag name. |
//div selects all <div> elements |
|
Attribute Value |
Locate elements based on attribute value. |
//*[@id='2] selects elements with id = 2 |
|
Text Content |
Locate elements based on text content |
//*[text()='Submit'] selects all elements with the text content Submit |
|
Element Hierarchy |
Locate elements based on position within the document hierarchy. |
//div/span selects all <span> elements that are descendants of a <div> element |
|
Axis Selection |
Locate elements based on their relationship to other elements. |
//a/ancestor::div selects all <div> elements that are ancestors of an <a> |
|
Logical Operators
|
Locates elements based on conditions created via logical operators (AND, OR). |
//input[@type='text' and @name='username'] |
Naturally, you can get as creative as you like with these various locator options. Simply explore the DOM for the document that you want to query with XPath and select the most appropriate type of locator for your requirements.
Beginners Guide to Using XPath with Selenium
Now that we’ve covered the XPath basics, let’s start our XPath tutorial for Selenium with a range of examples for using XPath to select elements within an HTML document.
For this article, we’ll be using the Developer's Tools within the Chrome browser. This is an ideal way to inspect the DOM and conduct XPath queries in a single environment.
If you’re new to this, no problem! Simply head over to the webpage you want to inspect, then press F12 to access your browser’s Developer’s Tools.
If you’re using Google Chrome, this will open the Inspect window. You can now press CTRL+F to open the XPath search box. It’s from here that we’ll be entering our XPath commands.
For each tutorial below, we’ll begin by navigating to a webpage, inspecting the DOM structure, then creating an XPath expression to locate our preferred element. Let’s dive in!
How To Find Basic Elements With XPath
In this example, we’ll begin by looking at the hackr.io tutorials page shown below. We’ll then use our Developer's Tools to inspect the DOM and locate the email input field for the pop-up window.
After we’ve found the element we need, we can find this input element with the basic XPath expression shown below.
Find Basic Element with XPath
---------------------------------------

//input[@id='wisepops-field-2065854-0']
This will then select all <input> elements in the document that have the attribute id with a value of wisepops-field-2065854-0. Now, I know there is only one result, so this will simply return the element we’re looking for.
As this is our first real example, I’ll quickly break down the different components of this XPath expression to reinforce how it relates to the general syntax.
- //input: This selects all <input> elements at any level within the document
- [@id='wisepops-field-2065854-0']: This condition (or predicate) filters the selected elements by enforcing that any elements must have an id attribute value of wisepops-field-2065854-0
We can also confirm that the element we’ve located with XPath is correct by selecting this in the Developers Tools window, which in turn will highlight the element, as shown below.
 Navigate to a webpage to investigate the structure
 Inspect the DOM with developer's tools & perform XPath query

Confirming the DOM element matches the XPath result
How To Locate Dynamic Elements via XPath & Contains()
In this example, we’ll continue with the hackr.io tutorials page, but we’ll focus on the tutorial submission button, as shown below.
In this instance, we’ll create an XPath query to locate this element with the contains() predicate. To do this, we’ll look for all elements with a title attribute that contains the text ‘Submit a tutorial’.
Again, I know that there is only one element that matches this criterion, so it should return a single result.
Find Dynamic Element with XPath & Contains
-------------------------------------------

//*[contains(@title,'Submit a tutorial')]
This XPath expression will then select all elements in the document that have a title attribute containing the given substring. Just like last time, let’s quickly break down this XPath query:
- //*: Selects all elements at any level within the document.
- [contains(@title,'Submit a tutorial')]: This predicate filters the selected elements for any with a title attribute containing the substring Submit a tutorial
We can also confirm that the element we’ve located is correct by selecting and highlighting it within the Developers Tools, as shown in the image below.
 Choose ‘Submit a tutorial’ element on the webpage
 Confirm the DOM element matches the XPath result
How To Find Elements with XPath & Text()
In this example, we’ll still be using the hackr.io tutorials page, but we’ll focus on the jobs search feature, as shown below.
In this instance, we’ll create an XPath query to locate this element with the text() method as the predicate. To do this, we’ll look for any span elements with text content that is equal to ‘Jobs’.
This is a helpful approach when dealing with dynamic elements, as we’re not dependent on its position in the hierarchy, but rather just that it’s a span element with certain text content.
Find Dynamic Element with XPath & Text
---------------------------------------

//span[text()='Jobs']
This XPath expression will then select all span elements in the document with text that matches the predicate. Again, just like before, I expect only one result to be returned.
Let’s also quickly break down this XPath query:
- //span: Selects all <span> elements at any level within the document
- [text()=' Jobs']: Predicate to filter span elements for the exact text content of Jobs
We can also confirm the element returned by the XPath query is correct by selecting and highlighting it within the Developers Tools, as shown in the image below.

Choose ‘Jobs’ element on the webpage

Perform XPath query to locate span element in the DOM

Confirm the DOM element matches the XPath results
How To Locate Elements via XPath & Logical Operators
In this example, we’ll be looking at the login page for hackr.io, and we’ll focus on the password field, as shown below.
This time, we’ll create an XPath query to locate this element via logical operators. To do this, we’ll look for input elements with a type attribute of password OR an id attribute of pass.
By using a logical OR, any elements that meet one or both of these conditions will be returned. This is a helpful approach when you’re unsure which attribute to focus on or if you want to inspect multiple elements.
Find Dynamic Element with XPath & Logical Operator
---------------------------------------------------

//input[@type='password' or @id='pass']
After running this XPath expression in the Developers Tools, we actually return 2 elements, as highlighted below. In this case, we’d need to look at each and choose the one that fits our requirements.
Let’s also break down this new XPath query and its components:
- //input: Selects all `<input>` elements at any level within the document.
- [@type='password' or @id='pass']: This predicate filters any selected elements to ensure they have a type of password` OR an id of pass
After inspecting both of the returned elements, we can once again select this to highlight it on the webpage, as shown below. This then confirms to us that we’re focusing on the correct element.
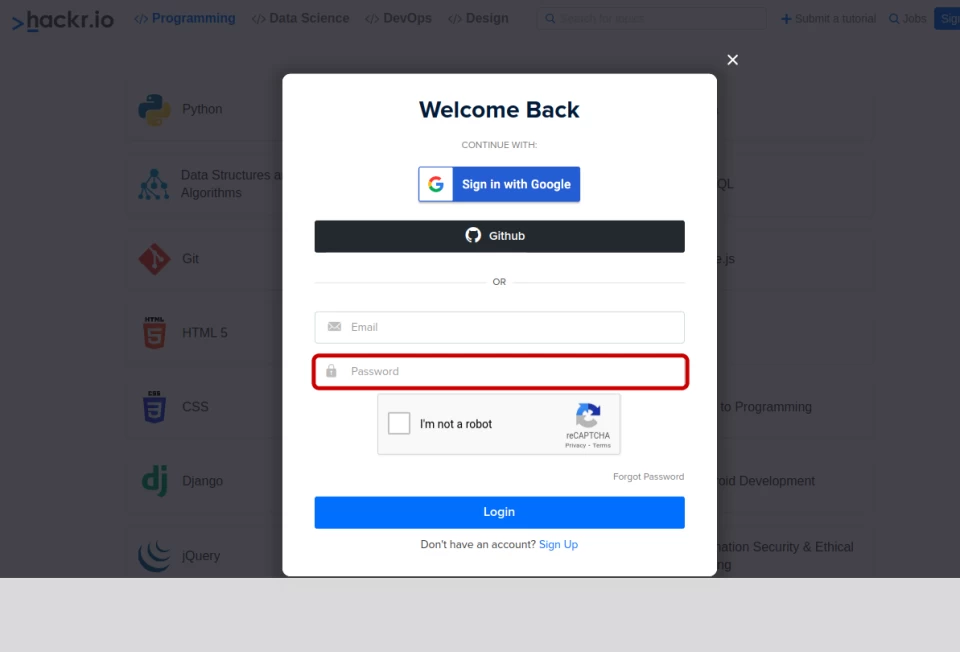
Focusing on the password field element of the login form

Perform XPath query to locate multiple elements in the DOM

Confirm the DOM password element matches the XPath results
Locating Dynamic Elements with XPath & Starts-With()
For this example, we’ll be looking at the hackr.io tutorials page, and we’ll be focusing on the main tutorials search bar, as shown below.
On this occasion, we’ll create an XPath query to locate this element with the starts-with() method as a predicate. To do this, we’ll look for input elements with a placeholder attribute that starts with the text Search for the language.
By using starts-with(), you can avoid reliance upon the element’s hierarchy in the document or any relationships with other elements. It’s also a useful way to shorten a query, as you can look for a substring rather than a full string.
Find Dynamic Element with XPath & Starts-With
------------------------------------------------------------

//input[starts-with(@placeholder,'Search for the language')]
After running this XPath query, we again return 2 elements, as highlighted below. This means that we’ll again need to examine these elements and select the right one for our requirements.
Let’s now break down this new XPath query approach and its components:
- //input: This selects all <input> elements at any level within the document.
- [starts-with(@placeholder,'Search for the language')]: This predicate filters the elements to those with a placeholder attribute starting with the substring Search for the language
After examining the returned elements, we can again select this to highlight it on the webpage, as shown below. This confirms to us that we’re focusing on the correct input element.

Focus on the main search bar the webpage

Perform XPath query to locate the search Bar in the DOM

Confirm the DOM search bar element matches the XPath results
Advanced Techniques: Finding Elements With Axes Methods
Now that we’ve covered the most common XPath scenarios, let’s take a look at axes methods, as these provide advanced capabilities for navigating and selecting elements based on their relationships within the document.
As we discussed with the XPath general syntax, the axis refers to the direction of navigation from the current node. And while this may seem complex initially, axes methods are essential for targeting specific elements and performing precise selections.
By using axes methods, we can do the following:
- Navigate through the document by traversing the hierarchical structure.
- Target elements based on relationships, for example, the descendants of an element.
- Advanced element filtering by combining them with other conditions and predicates.
In general, axes methods require a deeper understanding of XPath, but they can provide powerful and advanced techniques for navigating and selecting elements.
They are particularly valuable when you need to precisely target an element, making them invaluable for element selection and traversal.
For this set of tutorials, we’ll begin a full walkthrough with accompanying images for the first example. The remaining examples will then be variations on the same theme.
Axes Method: Using Following
In this example, we’ll be using the hackr.io tutorials page, and we’ll be focusing on the link for the JavaScript icon element, as shown below.
In this instance, we’ll create an XPath query to locate this element with axes methods. In particular, we’ll be looking for all elements with a class attribute of js-topic, we’re then looking for all <a> elements that come after these.
So you can see that we’re using a relationship with other element types to clarify what we’re looking for. And in this case, we’re saying that we only want <a> elements that come after elements that have a certain attribute value.
Find Dynamic Element with XPath Axes Method: Following
------------------------------------------------------

//*[@class='js-topic']//following::a
After running this XPath query, we return a whopping 43 elements, as highlighted below. This means that we’ll need to examine these elements and select the right one for our requirements.
We may also need to consider a re-designed XPath query to better narrow in our element, and I’d encourage you to look at this!
Let’s now break down this new advanced XPath query and its components:
- //*[@class='js-topic']: This selects all elements with any tag name (*) that have a class attribute of js-topic
- //following::a This selects all <a> elements that appear after the elements selected in the previous step, regardless of hierarchy or nesting.
After examining the 43 returned elements, we can select the correct element to highlight it on the webpage, as shown below.

Select JavaScript button element on webpage

Perform XPath query to return elements in the DOM

Confirm the DOM button element matches the XPath results
Axes Method: Using Ancestor
In this example, we’ve created an XPath axes method query using an ancestor.
In particular, we begin by locating all elements with the exact text content of Password, before returning any <div> elements that are ancestors of these.
So you can see that we’re saying that we only want <div> elements that are ancestors of elements with certain text contents.
Find Dynamic Element with XPath Axes Method: Ancestor
------------------------------------------------------

//*[text()='Password']//ancestor::div
Let’s quickly break down this advanced XPath query’s components:
- //*[text()='Password']: This selects all elements at any level in the document that have the exact text content of 'Password
- //ancestor::div: This selects all <div> elements that are ancestors of the elements selected in the previous step
Axes Method: Using Child
For this example, we’ve created an XPath query with axes methods that focus on child elements.
We start by locating all elements with a class attribute of navbar-brand ml-auto, before returning any <img> elements that are children of these.
So you can see that we’re clarifying that we only want <img> elements that are children of elements with certain class attribute values.
Find Dynamic Element with XPath Axes Method: Child
---------------------------------------------------

//*[@class='navbar-brand ml-auto']//child::img
Let’s now break down this advanced XPath query’s components:
- //*[@class='navbar-brand ml-auto']: This selects all elements at any level in the document with a class attribute of navbar-brand ml-auto
- //child::img: This selects all <img> elements that are children of the elements selected in the previous step
Axes Method: Using Preceding
In this example, we’ve created an XPath query that focuses on preceding elements.
We begin by locating all elements with a type attribute of text, before returning any <input> elements that are directly before these.
Find Dynamic Element with XPath Axes Method: Preceding
------------------------------------------------------

//*[@type='text']//preceding::input
Let’s now break down this XPath query:
- //*[@type='text']: This selects all elements at any level in the document that have the type attribute of text
- //preceding::input: This selects all <input> elements that appear before the elements selected in the previous step
So, this XPath expression identifies and selects all `<input>` elements that come before elements with the attribute `type` equal to `'text'`. It is useful when you want to locate and interact with specific input elements that precede certain elements in the document hierarchy.
Axes Method: Using Following-sibling
In this example, we’ve created an XPath query that focuses on following-sibling elements.
We begin by locating all elements with a class attribute of col-xs-12, before returning any <div> elements that are following-siblings of these.
What is a following-sibling? These are nodes that appear after a particular node within the document structure, but at the same nesting level.
When you visualize this, these elements are directly after the given node, but they are siblings, so they must be on the same nesting level.
Find Dynamic Element with XPath Axes Method: Following-Sibling
--------------------------------------------------------------

//div[@class='col-xs-12']//following-sibling::div
Let’s now break down this XPath query:
- //div[@class='col-xs-12']: This selects all <div> elements at any level in the document that have the class attribute of col-xs-12
- //following-sibling::div: This selects all <div> elements that are following siblings of the elements selected in the previous step
Axes Method: Using Parent
In this example, we’ve created an XPath query that focuses on parent elements.
We begin by locating all elements with a type attribute of text, before returning any <div> elements that are the parents of these.
Find Dynamic Element with XPath Axes Method: Parent
----------------------------------------------------

//*[@type='text']//parent::div
Let’s now break down this XPath query:
- //*[@type='text']: This selects all elements at any level in the document that have the type attribute of text
- //parent::div: This selects all <div> elements that are parents of the elements selected in the previous step
Axes Method: Using Self
For this example, we’ve created an XPath query that focuses on self, which is the context node that is currently being evaluated. This is useful when you want to explicitly refer to the current node within an XPath expression.
In this expression, we begin by locating all elements with a type attribute of text, before returning any <input> elements from these.
Find Dynamic Element with XPath Axes Method: Self
--------------------------------------------------

//*[@type='text']//self::input
Let’s now break down this advanced XPath query:
- //*[@type='text']: This selects all elements at any level in the document that have the type attribute of text
- //self::input: This selects all <input> elements from those selected in the previous step.
Axes Method: Using Descendant
In this example, we’ve created an XPath query that focuses on descendant elements.
We begin by locating all elements with a class attribute of login-buttons, before returning any <a> elements that are the descendants of these.
Find Dynamic Element with XPath Axes Method: Descendant
-------------------------------------------------------

//*[@class='login-buttons']//descendant::a
Let’s now break down this advanced XPath query:
- //*[@class='login-buttons']: This selects all elements at any level in the document that have a class of login-buttons
- //descendant::a: This selects all <a> elements that are descendants of the elements selected in the previous step
Axes Methods With Multiple Results
Finally, let's quickly touch on scenarios when your XPath queries with axes methods return multiple results.
In these cases, you can use indexing to select a specific element, as shown below. In this case, we select all elements with a title attribute of Search, before returning all following <input> elements and then indexing to the first element that is returned.
XPath Indexing with Multiple Results
-----------------------------------------

//*[@title='Search']//following::input[1]
Let’s now break down this interesting XPath query:
- //*[@title='Search']: This selects all elements at any level in the document that have a title attribute of Search
- //following::input[1]: This selects the first <input> element that appears after the elements selected in the previous step
Final Thoughts
We hope you’ve enjoyed learning how to use XPath in Selenium!
Whether you’re just starting out in test automation, QA, or web development, or you’re a professional looking to enhance your skills, our XPath in Selenium tutorial has covered a range of valuable and useful XPath in Selenium techniques.
Happy testing!
Want to level up your Selenium skills in 2024? Check out:
Udemy’s Top-Rated Selenium Course for Software Testing
Frequently Asked Questions
1. What Is An XPath In Selenium?
XPath in Selenium is a query language to navigate and locate elements within an HTML or XML document. It provides a precise way to identify and interact with specific elements on a web page, and it’s commonly used in web scraping and automated testing.
2. What Are The Different Types Of XPath In Selenium?
XPath expressions in Selenium can be either absolute or relative. Absolute XPath expressions provide the complete path from the root element, while a relative XPath expression is a more flexible way to locate elements based on their relationships within the document.
3. How Do You Find XPath?
If you want to find the XPath of an element, simply right-click the element on the actual webpage and then select Inspect. You’ll then enter the DOM with the element selected and highlighted. You can then right-click the DOM element and select Copy XPath.
4. Which Locator Is Faster In Selenium?
Typically, the ID attribute is the fastest locator in Selenium, as IDs are unique attributes, allowing for quick and direct identification.
People are also reading:
