If you’ve wanted to create desktop applications with Python, PyQt is one of the most powerful frameworks available. It provides an easy way to build professional-looking applications with user interfaces that are both flexible and feature-rich.
In this tutorial, I’ll walk you through the basics of PyQt by creating a simple app with labels, text fields, and buttons while explaining the key concepts you need to know.
By the end of this guide, you’ll have your first functional PyQt app and a solid understanding of how to expand these skills for more complex projects.
What is PyQt?
PyQt is a set of Python bindings for the Qt framework, one of the most widely used libraries for building cross-platform GUI applications. With PyQt, you can design powerful desktop applications that work on Windows, macOS, and Linux.
Here are the three key concepts of PyQt:
- The QApplication Object – This is the core of every PyQt application. It manages the event loop and global application settings.
- Widgets – Elements such as labels, buttons, and text fields that allow user interaction.
- Event Handling (Signals and Slots) – PyQt’s mechanism for responding to user interactions such as button clicks or text input.
Since PyQt doesn’t come pre-installed with Python, you need to install it first. You can do this by running:
pip install PyQt5Now, let’s dive in and build our first PyQt application!
Creating a Simple PyQt App
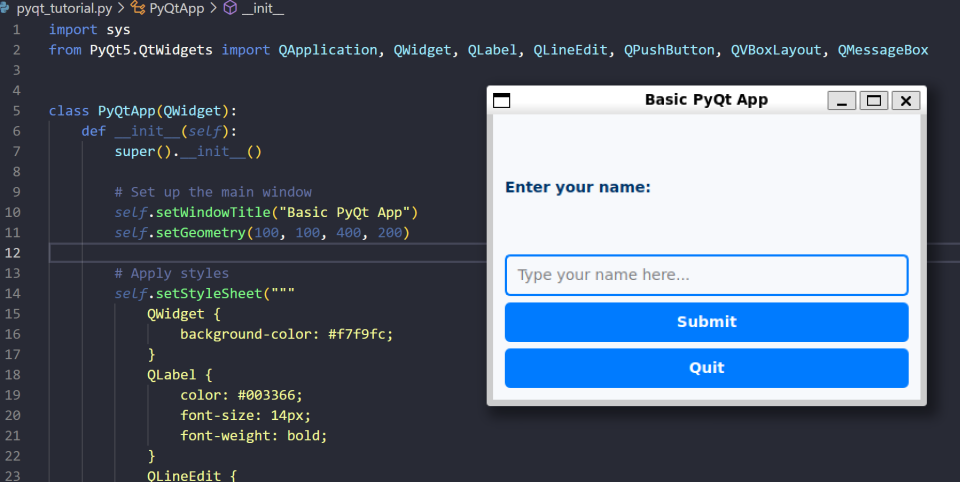
The best way to get started with PyQt is by building a basic application. Let’s go step by step to create a Python project with an output like I've shown below.
So, when you're ready, open your Python editor or IDE and then simply follow the steps below to create your first Python desktop app.
Step 1: Importing the Required Modules
Before we write any GUI code, we need to import the necessary PyQt modules:
import sys
from PyQt5.QtWidgets import QApplication, QWidget, QLabel, QLineEdit, QPushButton, QVBoxLayout, QMessageBoxQApplicationmanages the overall application.QWidgetis the base class for our main application window.QLabel,QLineEdit, andQPushButtonare widgets for displaying text, accepting user input, and handling button interactions.QVBoxLayoutis a layout manager that arranges widgets vertically.QMessageBoxis used for pop-up message dialogs.
Step 2: Creating the Main Application Window
Now, let’s initialize our main window:
app = QApplication(sys.argv)
window = QWidget()
window.setWindowTitle("Basic PyQt App - Procedural")
window.setGeometry(100, 100, 400, 200)QApplication(sys.argv): Creates an instance of our application.QWidget(): Creates the main window.setWindowTitle(): Sets the title of the window.setGeometry(): Defines the window’s size and position on the screen.
Step 3: Applying Styling
Styling in PyQt is done using the setStyleSheet() method, which follows a syntax similar to CSS (Cascading Style Sheets). This allows us to customize the appearance of widgets by specifying properties such as colors, borders, font sizes, and padding.
window.setStyleSheet("""
    QWidget {
        background-color: #f7f9fc;
    }
    QLabel {
        color: #003366;
        font-size: 14px;
        font-weight: bold;
    }
    QLineEdit {
        border: 2px solid #007BFF;
        border-radius: 5px;
        padding: 8px;
        font-size: 14px;
    }
    QPushButton {
        background-color: #007BFF;
        color: white;
        border-radius: 5px;
        padding: 10px;
        font-size: 14px;
        font-weight: bold;
    }
    QPushButton:hover {
        background-color: #0056b3;
    }
""")
Let's break down what we're doing here:
-
Selectors (
QWidget,QLabel, etc.) – These define styles for specific PyQt widget types. -
Properties (
background-color,font-size, etc.) – These define how each widget should look. -
Hover Effects (
QPushButton:hover) – This allows styling changes when a user hovers over a button.
This approach provides a flexible way to create professional-looking user interfaces without modifying each widget individually.
Step 4: Adding Widgets to the Application
Let’s add a label, a text input field, and two buttons.
layout = QVBoxLayout()

label = QLabel("Enter your name:", window)
layout.addWidget(label)

text_field = QLineEdit(window)
text_field.setPlaceholderText("Type your name here...")
layout.addWidget(text_field)QLabel(): Displays a message to the user.QLineEdit(): Provides a text input field where users can type.setPlaceholderText(): Gives users a hint on what to enter.
Step 5: Adding Buttons and Event Handling
Let’s add a submit button that displays a greeting and a quit button to close the application.
def submit_action():
user_input = text_field.text().strip()
if user_input:
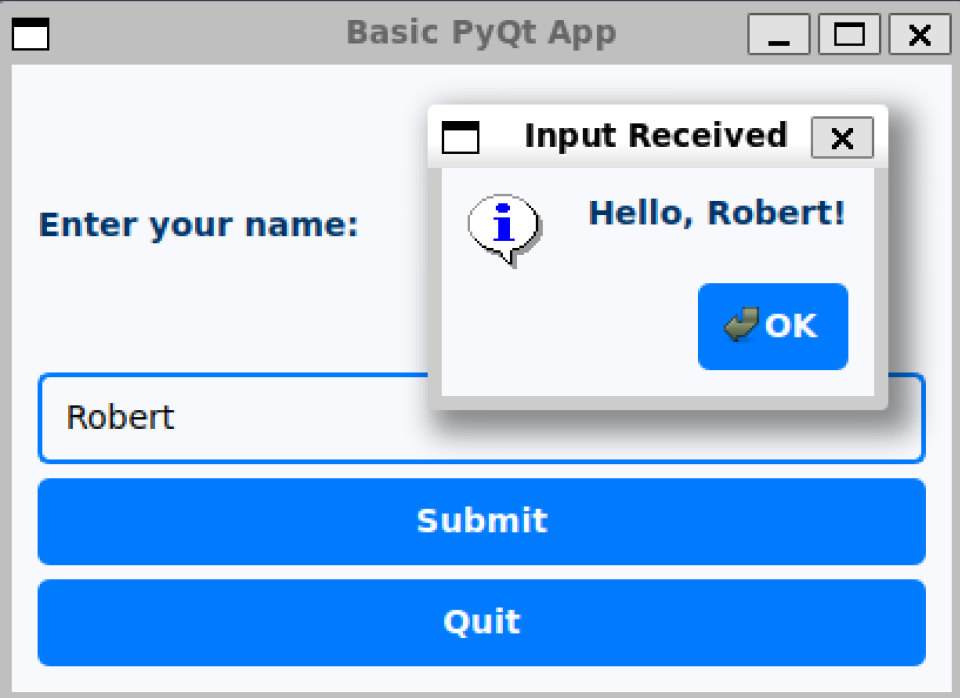
QMessageBox.information(window, "Input Received", f"Hello, {user_input}!")
else:
QMessageBox.warning(window, "No Input", "Please enter your name.")
submit_button = QPushButton("Submit", window)
submit_button.clicked.connect(submit_action)
layout.addWidget(submit_button)
quit_button = QPushButton("Quit", window)
quit_button.clicked.connect(window.close)
layout.addWidget(quit_button)QPushButton(): Creates buttons.clicked.connect(submit_action): Connects the button click to the function that displays the user’s input.QMessageBox.information(): Displays a pop-up with the entered name.QMessageBox.warning(): Shows a warning if no input is provided.
Finally, we set the layout and run the app:
window.setLayout(layout)
window.show()
sys.exit(app.exec())
Then, simply run your Python script to reveal an app window like I've shown below.
Now, let’s refactor this code into an Object-Oriented Programming (OOP) structure for better maintainability.
Refactoring the PyQt App Using OOP
For larger applications, organizing your code using classes is a best practice. If you're new to Python and unfamiliar with OOP, you may want to come back to this later. Otherwise, here's how to refactor our app using a class:
class PyQtApp(QWidget):
    def __init__(self):
        super().__init__()

        # Set up the main window
        self.setWindowTitle("Basic PyQt App")
        self.setGeometry(100, 100, 400, 200)

        # Apply styles
        self.setStyleSheet("""
            QWidget {
                background-color: #f7f9fc;
            }
            QLabel {
                color: #003366;
                font-size: 14px;
                font-weight: bold;
            }
            QLineEdit {
                border: 2px solid #007BFF;
                border-radius: 5px;
                padding: 8px;
                font-size: 14px;
            }
            QPushButton {
                background-color: #007BFF;
                color: white;
                border-radius: 5px;
                padding: 10px;
                font-size: 14px;
                font-weight: bold;
            }
            QPushButton:hover {
                background-color: #0056b3;
            }
        """)

        # Initialize the UI
        self.init_ui()

    def init_ui(self):
        # Create layout
        layout = QVBoxLayout()

        # Label
        self.label = QLabel("Enter your name:", self)
        layout.addWidget(self.label)

        # Text Input Field
        self.text_field = QLineEdit(self)
        self.text_field.setPlaceholderText("Type your name here...")
        layout.addWidget(self.text_field)

        # Submit Button
        self.submit_button = QPushButton("Submit", self)
        self.submit_button.clicked.connect(self.submit_action)
        layout.addWidget(self.submit_button)

        # Quit Button
        self.quit_button = QPushButton("Quit", self)
        self.quit_button.clicked.connect(self.close)
        layout.addWidget(self.quit_button)

        # Set layout
        self.setLayout(layout)

    def submit_action(self):
        user_input = self.text_field.text().strip()
        if user_input:
            QMessageBox.information(self, "Input Received", f"Hello, {user_input}!")
        else:
            QMessageBox.warning(self, "No Input", "Please enter your name.")


# Run the application
if __name__ == "__main__":
    app = QApplication(sys.argv)
    window = PyQtApp()
    window.show()
    sys.exit(app.exec())
How the OOP Version Works
-
Class Structure: The application is encapsulated in the
PyQtAppclass. This makes the code more modular and easier to manage. -
Initialization (
__init__): The__init__method sets up the application by configuring the main window and calling theinit_uimethod. -
Method Organization: Widget creation and event handling are organized into separate methods within the class. For example,
init_uidefines the layout, whilesubmit_actionhandles button clicks. -
Encapsulation: By grouping UI logic into a class, we improve readability and reusability.
I hope you can see how effective this approach is, but just in case you need more convincing, here are the key advantages of OOP:
-
Organization: Group related functions and data together.
-
Reusability: Easily extend the class for more features.
-
Readability: Cleaner and more modular code.
Wrapping Up
Congratulations! You’ve built your first PyQt app and learned the foundational concepts of GUI programming in Python. With this knowledge, you can create more complex applications like calculators, to-do lists, or even image editors.
Feel free to experiment with the code, add more widgets, or improve the styling. Happy coding!